


If you’ve ever tried to set up SideStore or sideload IPA files manually, you know the drill: hunting for the right files, wrestling with the command line, managing certificates, and praying the pairing file ends up in the right place. It works, but it’s rarely a smooth experience. Currently, one of the best desktop software for sideloading IPA files is iLoader, and the good thing is this software does not require any jailbreaking in order to use.
iLoader is a free, open-source, cross-platform desktop application that transforms iOS sideloading from a technical chore into a point-and-click breeze. Whether you’re installing SideStore for the first time, sideloading a tweaked IPA, or just need to manage your development certificates, iLoader handles it all with a clean, intuitive interface.
This comprehensive guide will walk you through everything iLoader has to offer: from installation and first-time setup to advanced features like certificate management and multi-account support.
What is iLoader?
iLoader is a desktop utility designed to simplify every aspect of iOS app sideloading. Built with the modern Tauri framework (Rust + TypeScript), it provides a unified graphical interface for the most common sideloading tasks [citation:iLoader Features].
Think of it as the ultimate companion to SideStore. While SideStore handles on-device app management and wireless refreshing, iLoader handles the heavy lifting on your computer:
- One-click SideStore installation with automatic certificate and pairing file setup
- Direct IPA sideloading without complex tools
- Centralized certificate management (view, revoke, create)
- Pairing file management for SideStore, StikDebug, Protokolle, and more
- Multi-Apple ID support for managing multiple devices or accounts
Best of all, it’s completely free, open source (MIT license), and runs natively on Windows, macOS, and Linux [citation:iLoader Home].
Why Choose iLoader?
The iOS sideloading landscape has several tools, but iLoader stands out for specific reasons [citation:iLoader Home]:
| Feature | iLoader | Traditional Methods |
|---|---|---|
| Setup complexity | Point-and-click GUI | Command line or manual file management |
| iTunes requirement | Windows only (for drivers) | Often required on all platforms |
| Certificate management | Built-in GUI | Apple Developer portal or terminal |
| Pairing files | Auto-placed for common apps | Manual copying to app directories |
| Cross-platform | ✅ Native on Windows, macOS, Linux | Varies by tool |
| Cost | Free, open-source | Often free, but with limitations |
| Multiple Apple IDs | ✅ Save and switch easily | Usually single-account |
Prerequisites: What You’ll Need
Before diving in, ensure you have everything ready. The requirements are minimal, but meeting them ensures a smooth experience [citation:iLoader Docs].
Computer Requirements (by OS)
| Operating System | Requirements | Special Notes |
|---|---|---|
| Windows 10/11 | iTunes (for usbmuxd drivers), Administrator access | 64-bit only; 32-bit not supported |
| macOS 10.15+ | Nothing extra—usbmuxd is built-in | Works on Intel and Apple Silicon |
| Linux | usbmuxd installed via package manager | See commands below for your distro |
Linux usbmuxd installation commands:
bash
# Ubuntu/Debian
sudo apt install usbmuxd libimobiledevice6 libimobiledevice-utils

# Fedora/RHEL/CentOS
sudo dnf install usbmuxd libimobiledevice

# Arch Linux
sudo pacman -S usbmuxd libimobiledevice

# openSUSE
sudo zypper install usbmuxd libimobiledevice
iOS Device Requirements
- iOS Version: 15.0–15.8.5, 16.0–17.7.7, or 18.0–26.2 [citation:iLoader Download]
- Developer Mode: Must be enabled (iOS 16+)
- USB Cable: A functional data cable (original Apple cable recommended)
- Trust Status: Device must be unlocked and “Trust This Computer” confirmed
Account Requirements
- Apple ID: Any free Apple account (case-sensitive!)
- Internet Connection: Required for initial authentication
- No Paid Account Needed: Free developer accounts work perfectly [citation:iLoader FAQ]
Step-by-Step Installation Guide
Let’s walk through installing iLoader on your specific platform, then using it to set up SideStore.
Phase 1: Install iLoader on Your Computer
For Windows Users [citation:iLoader Download]
- Install iTunes (Required for drivers)
- Download iTunes from here
- Run the installer and restart if prompted
- Open iTunes at least once to complete driver installation
- Download iLoader
- Visit the iLoader download page
- Choose either:
- MSI Installer (recommended):
iloader-windows-x64.msi - Portable EXE:
iloader-windows-x64.exe
- MSI Installer (recommended):
- Install and Launch
- Right-click the installer and select “Run as administrator”
- If Windows Defender SmartScreen appears, click “More info” then “Run anyway”
- Follow the installation wizard (default settings are fine)
- Launch iLoader from the Start menu or desktop shortcut
For macOS Users [citation:iLoader Download]
- Download iLoader
- Get the universal disk image:
iloader-darwin-universal.dmg
- Get the universal disk image:
- Install the App
- Open the downloaded DMG file
- Drag the iLoader icon to your Applications folder
- Bypass Gatekeeper (if needed)
- If you see “App can’t be opened” warning:
- Right-click the app in Applications and select “Open”
- Click “Open” in the confirmation dialog
- Or go to System Settings > Privacy & Security and click “Open Anyway”
- If you see “App can’t be opened” warning:
For Linux Users [citation:iLoader Download]
- Install usbmuxd (if not already done—see commands above)
- Download iLoader
- Choose your preferred format:
- AppImage (recommended for most users):
iloader-linux-amd64.AppImage - Debian/Ubuntu:
iloader-linux-amd64.deb - Fedora/RHEL:
iloader-linux-x86_64.rpm
- AppImage (recommended for most users):
- Choose your preferred format:
- Install and Launch
- AppImage:bashchmod +x iloader-*.AppImage ./iloader-*.AppImage
- Debian/Ubuntu:bashsudo dpkg -i iloader-*.deb sudo apt-get install -f # Install dependencies if needed iloader
- Fedora/RHEL:bashsudo dnf install iloader-*.rpm iloader
Phase 2: Connect Your iOS Device
- Plug in your iPhone/iPad using a USB cable
- Unlock your device and keep it unlocked
- Trust the computer—on your iOS device, tap “Trust This Computer” and enter your passcode
- Verify connection—your device should appear in iLoader automatically
Troubleshooting connection issues:
- If device isn’t detected, try a different USB cable or port
- On Windows, ensure iTunes is running
- On Linux, check usbmuxd status:
sudo systemctl status usbmuxd - Restart both computer and device if problems persist
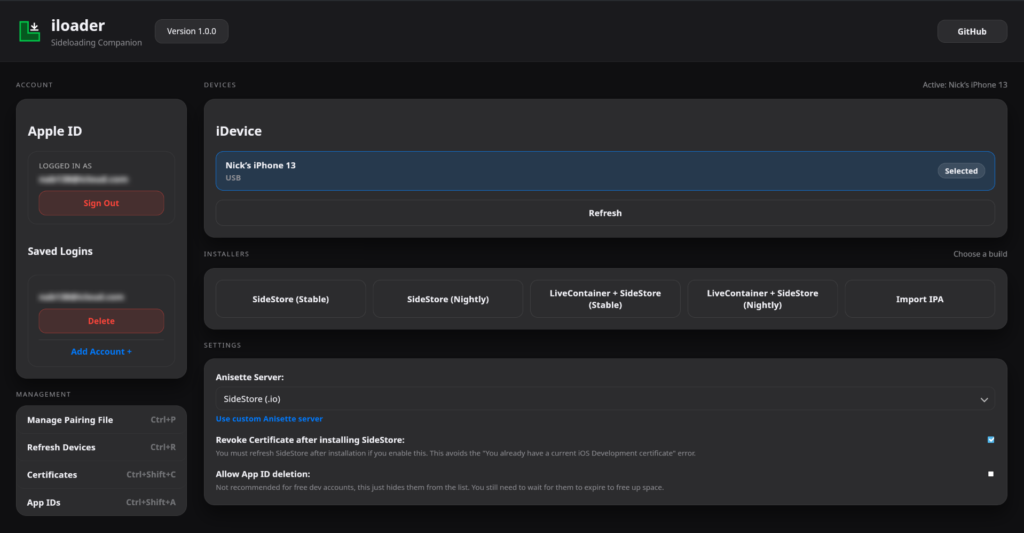
Phase 3: Install SideStore with iLoader
This is the most common use case and iLoader’s flagship feature [citation:iLoader Docs].
- Launch iLoader and sign in with your Apple ID
- Remember: credentials are case-sensitive!
- The Apple ID doesn’t need to match your device’s iCloud account
- Select your device from the list (if multiple are connected)
- Choose installation option
- Select “Install SideStore (Stable)”
- (Optional) You may also see “Install LiveContainer + SideStore” —this bundles both apps
- Wait for automation magic
- iLoader automatically:
- Downloads the latest SideStore build
- Creates and imports development certificates
- Places pairing files in the correct locations
- Installs SideStore on your device
- iLoader automatically:
- Do not disconnect until you see a success message
Phase 4: Complete Setup on Your iOS Device
After iLoader finishes, you must complete the setup directly on your iPhone or iPad. The steps vary by iOS version [citation:iLoader Docs].
For iOS 15 Users
- Open Settings > General > VPN & Device Management
- Tap your Apple ID under “Developer App”
- Tap “Trust [Your Apple ID]” then confirm
- Install LocalDevVPN from the iApp Store and connect
- Open SideStore, sign in, and tap the “7 DAYS” button next to SideStore to refresh
For iOS 16 & 17 Users
- Settings > General > VPN & Device Management → Trust your Apple ID
- Settings > Privacy & Security → Scroll to bottom → Enable Developer Mode (device restarts)
- Install LocalDevVPN, connect, open SideStore, sign in, and refresh
For iOS 18+ Users
- Settings > General > VPN & Device Management → Tap your Apple ID → “Allow & Restart” (enter passcode)
- Settings > Privacy & Security → Enable Developer Mode (restarts)
- Install LocalDevVPN, connect, open SideStore, sign in, and refresh
Success! SideStore is now fully installed and ready to sideload apps wirelessly.
Beyond SideStore: Other iLoader Features
iLoader isn’t just for installing SideStore. It’s a full-featured sideloading toolbox.
📱 Sideloading Any IPA File
Want to install a tweaked app directly, without going through SideStore? iLoader can do that [citation:iLoader Docs].
- Connect your device and open iLoader
- Look for “Install IPA” or “Sideload IPA” option
- Browse and select your
.ipafile - Confirm installation and wait for completion
- The app appears on your home screen (trust the developer if prompted)
Use cases:
- Installing apps before SideStore is set up
- Testing IPA files quickly
- Installing apps that might conflict with SideStore’s management
🔐 Certificate Management
Development certificates are the keys to sideloading. iLoader gives you full control [citation:iLoader Features].
- View Certificates: See all active certificates, their expiration dates, and types
- Revoke Certificates: Remove old or unused certificates (be careful—this breaks apps signed with them!)
- Create New Certificates: Generate fresh certificates when needed
Why manage certificates?
- Apple limits how many certificates you can have
- Expired certificates cause installation failures
- Revoking unused ones frees up space for new ones
🔑 Pairing File Management
Pairing files are essential for apps like SideStore, StikDebug, and Protokolle to communicate with your device. iLoader handles them effortlessly [citation:iLoader Features].
- Automatic placement during SideStore installation
- Import/export for backup or transfer
- Replace when files expire (common after iOS updates)
- Manage files for multiple apps in one place
👤 Multiple Apple ID Support
If you manage devices for family members or use different accounts for testing, iLoader’s multi-account feature is a lifesaver [citation:iLoader Features].
- Save multiple Apple ID credentials securely (local storage only)
- Switch between accounts with a single click
- Per-device account assignment
- No need to re-enter credentials repeatedly
Platform-Specific Guides
Windows Deep Dive [citation:iLoader Download]
Key considerations:
- iTunes must be installed for usbmuxd drivers—this is non-negotiable
- Always run iLoader as administrator for best results
- If Windows Defender blocks iLoader, add an exclusion or temporarily disable real-time protection
Portable vs. MSI:
- MSI installer: Better integration, adds Start Menu shortcut, handles updates
- Portable EXE: No installation needed, great for USB drives or temporary use
macOS Deep Dive [citation:iLoader Download]
Key considerations:
- No additional software needed—usbmuxd is built into macOS
- Universal binary works on both Intel and Apple Silicon
- Gatekeeper may block first launch—use right-click → Open to bypass
Security note: If you see “iLoader cannot be opened because the developer cannot be verified,” this is normal for open-source apps not notarized by Apple. The app is safe (you can audit the code on GitHub).
Linux Deep Dive [citation:iLoader Download]
Key considerations:
- usbmuxd installation varies by distribution—use the commands provided above
- After installing usbmuxd, ensure the service is running:
sudo systemctl start usbmuxd - Add your user to the
plugdevgroup for device access:sudo usermod -a -G plugdev $USER(log out and back in)
AppImage advantages:
- Works on any distribution without installation
- Self-contained with all dependencies
- Just make it executable and run
Troubleshooting Common Issues
Based on the official documentation, here are solutions to the most frequent problems [citation:iLoader Docs] [citation:iLoader FAQ].
“Device Not Detected”
| Platform | Solutions |
|---|---|
| All platforms | Try different USB cable/port, restart both devices, unlock device and keep screen on |
| Windows | Ensure iTunes is installed and running; check Device Manager for Apple Mobile Device USB driver |
| macOS | Check System Information → USB to see if device appears; restart usbmuxd: sudo killall -STOP -c usbd (rarely needed) |
| Linux | Verify usbmuxd running: systemctl status usbmuxd; check dmesg for USB errors; add user to plugdev group |
“Installation Fails”
- Check Developer Mode: On iOS 16+, ensure it’s enabled in Settings > Privacy & Security
- Trust Certificate: Go to Settings > General > VPN & Device Management and verify your Apple ID is trusted
- Certificate Limit: You may have too many active certificates—use iLoader to revoke unused ones
- Apple ID Issues: Verify credentials (case-sensitive!) and ensure account isn’t locked
- Internet Connection: iLoader needs internet for initial authentication
“SideStore Won’t Open/Refresh”
This is a common post-installation issue [citation:iLoader FAQ].
- Ensure LocalDevVPN is installed and connected
- Verify Developer Mode is enabled (iOS 16+)
- Re-trust the developer certificate in Settings > General > VPN & Device Management
- Try refreshing SideStore manually by tapping the “7 DAYS” button
- If all else fails, reinstall SideStore using iLoader
“Pairing File Expired”
Pairing files can expire after iOS updates, device resets, or randomly [citation:iLoader Docs].
Solution: Use iLoader to replace the pairing file:
- Connect your device to computer
- Open iLoader
- Look for pairing file management options
- Select your device and app (SideStore, StikDebug, etc.)
- Click “Replace” or “Regenerate”
Frequently Asked Questions
Q: Do I need a paid Apple Developer account?
A: No. iLoader works perfectly with free Apple accounts. Apps will expire after 7 days, but SideStore can refresh them automatically [citation:iLoader FAQ].
Q: Is iLoader safe? Will my Apple ID be stolen?
A: iLoader is completely open source—you can review every line of code on GitHub. Your credentials are stored locally on your computer and never sent to external servers [citation:iLoader FAQ].
Q: Do I need to jailbreak my device?
A: Absolutely not. iLoader works on stock, non-jailbroken iOS devices using Apple’s official developer signing mechanism [citation:iLoader FAQ].
Q: Can I use iLoader on multiple computers?
A: Yes. iLoader is portable (especially the Windows EXE and Linux AppImage versions). You can run it from a USB drive or install it on multiple machines.
Q: What’s the difference between iLoader and SideStore?
A: Think of them as complementary tools:
- iLoader runs on your computer and handles initial setup, certificate management, and direct IPA installation
- SideStore runs on your iOS device and manages apps, wireless refreshing, and ongoing sideloading
Q: Why does iLoader need iTunes on Windows?
A: iLoader itself doesn’t use iTunes, but Windows needs the Apple Mobile Device USB drivers that come with iTunes to communicate with iPhones over USB.
Q: Can I install apps directly with iLoader without SideStore?
A: Yes! iLoader can sideload any IPA directly to your device. However, those apps will still expire after 7 days and won’t have automatic refresh—that’s where SideStore comes in.
Q: The app I installed won’t open—it crashes immediately.
A: This usually means the developer certificate isn’t trusted. Go to Settings > General > VPN & Device Management and trust your Apple ID profile. Also ensure Developer Mode is enabled (iOS 16+).
Advanced Tips & Tricks
Setting a Default Apple ID
In iLoader settings, you can set a default Apple ID to auto-login on startup—saves time if you always use the same account [citation:iLoader Features].
Automated SideStore Refresh Reminder
While iLoader doesn’t run on your iPhone, you can use iOS Shortcuts to remind yourself to open SideStore weekly and keep apps fresh.
Using with Multiple Devices
iLoader’s multi-account feature shines here. Save each device’s dedicated Apple ID and switch effortlessly when connecting different iPhones or iPads.
Beta Testing with Nightly Builds
If you’re adventurous, iLoader can install nightly SideStore builds. Just select the appropriate option instead of “Stable.”
The Future of iLoader
The developer has exciting features planned [citation:iLoader Features]:
- Default Account: Auto-login on startup
- Auto Import: Automatically import SideStore account information
- DDI Mounting: Mount Developer Disk Image and auto-open SideStore post-installation
- Developer Mode Check: Automatic detection and warnings if Developer Mode is off
- Better Error Messages: More actionable troubleshooting guidance
Conclusion: The Essential Sideloading Toolkit
iLoader fills a critical gap in the iOS sideloading ecosystem. It takes the pain out of the initial setup process, provides a central hub for certificate and pairing file management, and makes direct IPA installation trivially easy.
Whether you’re a first-time user setting up SideStore for the first time or a veteran sideloader managing multiple devices and Apple IDs, iLoader saves you time, frustration, and command-line headaches.
Best of all, it’s free, open source, and cross-platform—a tool built by the community, for the community.
0 Comments
Be the first to comment.