AutoVPN Tweak: Smart, Automated VPN Control on Your Jailbroken iPhone (iOS 15 & 16)
Online privacy has always been paramount and coupled with the fact that geo-restricted content is everywhere, a VPN (Virtual Private Network) has become an essential tool for many iPhone users. Whether you’re bypassing regional restrictions on Netflix, securing your data on public Wi-Fi, or simply browsing anonymously, a VPN is your first line of defense. But managing a VPN can be a chore—turning it on and off manually, remembering to activate it for sensitive apps, or silencing it when you’re on your trusted home network.
For jailbroken iPhone users running iOS 15 or iOS 16, there’s a smarter way. Discover AutoVPN Tweak, a powerful $1.99 tweak developed by Snail that brings intelligent, automated VPN control to your device. Available on the Havoc repository, AutoVPN transforms your VPN from a manual tool into a seamless, background guardian that adapts to your behavior.
This comprehensive guide will walk you through everything AutoVPN has to offer, from installation and configuration to advanced automation scenarios, ensuring you get the most out of this essential jailbreak tweak.
What is AutoVPN and Why Do You Need It?
AutoVPN is a lightweight jailbreak tweak designed to automate your VPN connection based on customizable triggers. Its core function is simple: it turns your VPN on or off automatically depending on the Wi-Fi network you join or the apps you launch. But beneath that simplicity lies a depth of control that privacy-conscious power users will love.
The Problem AutoVPN Solves
Imagine these common scenarios:
- You connect to a public coffee shop Wi-Fi and want your VPN active immediately for security.
- You launch your banking app and prefer a direct, non-VPN connection for stability.
- You’re at home on your trusted network and don’t need the VPN, but you keep forgetting to turn it off.
- You want visual confirmation of your VPN status without a bulky “VPN” text cluttering your status bar.
AutoVPN handles all of this automatically. It’s about making your VPN work for you, intelligently and invisibly, rather than you working for it.
Key Features at a Glance
Based on the developer’s description and community feedback, here’s what AutoVPN brings to the table:
- Wi-Fi Based Automation: Automatically enable or disable your VPN when you connect to specific Wi-Fi networks.
- App Based Automation: Trigger your VPN to turn on or off when you open or close specific applications.
- Enhanced Status Bar Indicator: Replace the standard “VPN” text with a discreet, customizable dot.
- Color Customization: Choose the color of the new status bar indicator to match your theme or preference.
- Post-Respring Auto-Launch: Ensure your VPN automatically reconnects after a respring or device reboot.
- Easy Management: A dedicated preferences pane in the Settings app for granular control.
- Compatibility: Fully tested with modern rootless jailbreaks like Dopamine and palera1n (rootless) on iOS 15 and 16.
Prerequisites: Before You Install AutoVPN
To use AutoVPN, your device must meet the following requirements:
Jailbreak Requirements
- Jailbroken iPhone or iPad running iOS 15 or iOS 16 .
- A modern, rootless jailbreak such as Dopamine (for A12+ devices on iOS 15-16) or palera1n (for older devices).
- A package manager that can access the Havoc repository. This is typically Sileo or Zebra for rootless jailbreaks.
VPN Requirements
- You need a VPN service installed and configured on your device. AutoVPN does not provide a VPN; it controls your existing VPN connection. This works with most VPN apps that integrate with iOS’s native VPN configurations (e.g., NordVPN, ExpressVPN, ProtonVPN, or even custom IKEv2/OpenVPN setups).
Step-by-Step Installation Guide
Installing AutoVPN is straightforward, but because it’s a paid tweak, you’ll need to ensure your package manager is set up correctly.
Phase 1: Add the Havoc Repository
- Open your package manager (Sileo or Zebra).
- Navigate to the Sources tab.
- Tap Edit (or the “+” icon), then tap Add.
- Enter the repository URL:
https://havoc.app/ - Tap Add Source. Wait for the source to refresh.
Phase 2: Purchase and Install AutoVPN
- Once Havoc is added, use the search function to find “AutoVPN” by Snail.
- Tap on the tweak to view its details. You’ll see the price ($1.99 USD) and a description.
- Tap the “Get” or “Purchase” button. You may need to create a Havoc account or log in to complete the purchase.
- After purchase, tap “Install” (or “Queue”) and then “Confirm” to begin the installation.
- Once the installation is complete, tap “Restart SpringBoard” (or “Respring”) to activate the tweak. Your device will respring, and you’ll be back at the lock screen.
Configuring AutoVPN: A Detailed Walkthrough
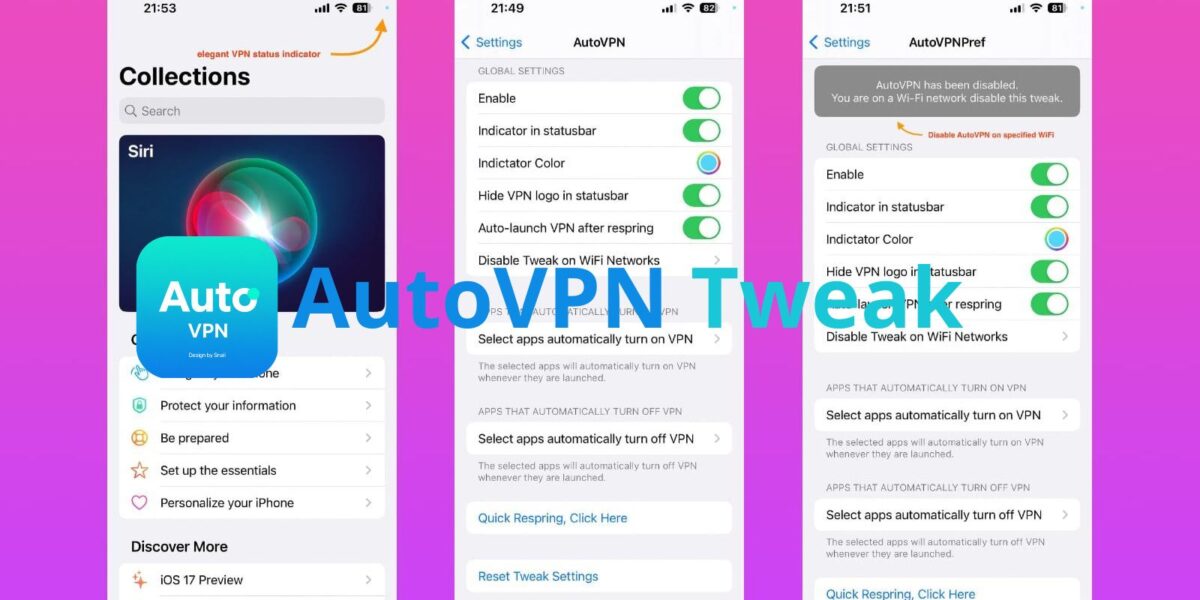
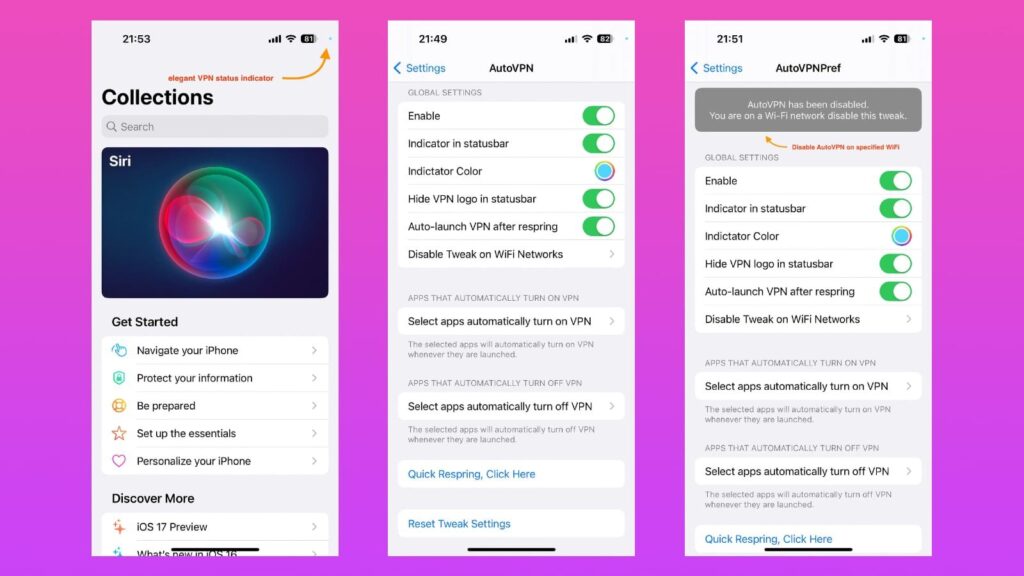
After installation, you’ll find a new preferences pane in the Settings app. Open Settings and scroll down to find AutoVPN. Let’s explore each section.
1. Main Settings Toggle
- Enable AutoVPN: This is the master switch. Toggle it ON to activate all the automation rules you set below. You can quickly disable all automation here without losing your configured rules.
2. Status Bar Customization
This section deals with how AutoVPN visually indicates your VPN status.
- Show New VPN Indicator: Enable this to replace the standard “VPN” text with a small dot.
- Indicator Color: Tap this to choose a color for the new dot. You can select a system color or use a custom hex code. This is great for matching a theme or making it highly visible (e.g., bright green) or very subtle (e.g., dark gray).
- Hide Original VPN Icon: This option hides the default “VPN” text entirely. It works in conjunction with the new indicator—you can have the dot only, or even no indicator at all if you prefer.
3. VPN Automation Settings
This is the core of AutoVPN, where you define the rules for your VPN.
Auto-Enable VPN After Respring
- Toggle: When enabled, AutoVPN will automatically attempt to connect your VPN whenever your device resprings or reboots. This ensures you’re always protected after a respring, without having to manually reconnect.
Wi-Fi Blacklist (Disable VPN on Trusted Networks)
- This powerful feature lets you specify Wi-Fi networks where your VPN should NOT be active.
- How it works: When you connect to a Wi-Fi network listed here, AutoVPN will automatically disconnect your VPN (if it’s connected). When you leave this network (e.g., switch to cellular or another Wi-Fi), AutoVPN can automatically reconnect your VPN, depending on your other settings.
- How to use:
- Tap “Wi-Fi Blacklist” .
- Tap “Add New Network” .
- Enter the name (SSID) of your home or office Wi-Fi network exactly as it appears.
- You can add multiple networks. This is perfect for your trusted home or work Wi-Fi where a VPN might be unnecessary or interfere with local network services like printing or file sharing.
App Blacklist (Disable VPN for Specific Apps)
- This feature allows you to specify applications where you want the VPN to be disabled when those apps are in the foreground.
- How it works: When you open an app on your blacklist, AutoVPN temporarily disconnects your VPN. When you close that app or switch to another (non-blacklisted) app, AutoVPN reconnects your VPN.
- Why use it? Some apps, particularly banking apps or streaming services, can be finicky with VPNs. They might block access, display errors, or load content slowly. By adding them to the blacklist, you ensure a stable, direct connection only when using those specific apps, while maintaining VPN protection for everything else.
- How to use:
- Tap “App Blacklist” .
- Tap “Add New App” .
- A list of your installed applications will appear. Select the ones you want to exclude from the VPN.
- You can manage the list by tapping “Edit” to remove apps.
4. Apply and Reset
- Apply Changes via Respring: Any time you make changes to your settings, especially if you modify the blacklists, it’s a good practice to tap this button. It will trigger a respring to ensure all rules are loaded correctly.
- Reset All Settings: This button will revert AutoVPN to its default state, clearing all your blacklists and resetting indicator options. Use this if you want to start over or if you’re experiencing conflicts.
Advanced Usage: Crafting Your Perfect VPN Automation
The real power of AutoVPN lies in combining its features. Let’s look at some practical usage scenarios.
Scenario 1: The Security-Conscious Traveler
Goal: VPN always on, except on home Wi-Fi, with a discreet status indicator.
- Status Bar: Enable “Show New VPN Indicator” and choose a subtle gray dot. Enable “Hide Original VPN Icon.”
- Wi-Fi Blacklist: Add your home Wi-Fi SSID.
- App Blacklist: (Optional) Add your banking app if you’ve experienced issues with it over VPN.
- Auto-Enable After Respring: Enable.
- Result: You’re protected everywhere. At a coffee shop, the VPN is on. At home, it automatically disconnects. You have a tiny dot confirming your status, and you never have to think about it.
Scenario 2: The Streaming Enthusiast
Goal: VPN only for streaming apps to access geo-blocked content, but off for everything else to maintain speed.
- Status Bar: You might keep the indicator on to know when you’re “region-shifting.”
- Wi-Fi Blacklist: (Optional) Keep it empty, or use it to disable VPN on your home network if streaming apps work locally.
- App Blacklist: This is the key. You would NOT put your streaming apps here. Instead, AutoVPN’s default behavior (with no blacklist) is to keep the VPN on based on the main toggle. However, if you want the VPN only for streaming, you’d need to think inversely. A common trick is to use a VPN app that supports “split tunneling” (per-app VPN) alongside AutoVPN for Wi-Fi automation. AutoVPN’s App Blacklist is for disabling VPN on specific apps, not enabling it. For this scenario, you’d rely on your VPN app’s native per-app feature, and use AutoVPN purely for Wi-Fi-based rules.
Scenario 3: The Battery Saver
Goal: Minimize VPN usage to save battery on the go, but ensure it’s active on public Wi-Fi.
- Status Bar: Keep the indicator on to be aware of your status.
- Wi-Fi Blacklist: Do not use this. Instead, think of it as a “Wi-Fi Whitelist” by using the feature inversely.
- App Blacklist: Keep empty.
- Strategy: With AutoVPN, if you have no Wi-Fi blacklist entries and the master switch is ON, the VPN will be on all the time (cellular and Wi-Fi). To have it only on public Wi-Fi, you’d need to use a combination of iOS’s native “VPN on Demand” feature (if your VPN supports it) and AutoVPN. AutoVPN’s strength is in overriding the global state based on networks, not creating a “VPN only on cellular” rule directly.
Troubleshooting Common Issues
Even with a well-made tweak like AutoVPN, you might encounter occasional hiccups. Here are solutions to common problems based on community forums and user experiences.
“AutoVPN doesn’t seem to do anything. My VPN stays on/off all the time.”
- Check the Master Switch: Ensure “Enable AutoVPN” is toggled ON in Settings.
- Verify Your Blacklists: If you have a Wi-Fi blacklist, make sure the network name (SSID) is entered exactly correctly, including spaces and special characters. Go to Settings > Wi-Fi, tap the “i” next to your network, and copy the name from there.
- Respring After Changes: Always tap “Apply Changes via Respring” after modifying your blacklists or settings to ensure the new rules are loaded.
“The new status bar dot isn’t showing.”
- Ensure Both Options Are Set: You need to have “Show New VPN Indicator” enabled. You may also need to have “Hide Original VPN Icon” enabled for the dot to appear in the same spot, otherwise, they might conflict.
- Check for Conflicts: Another status bar customization tweak (like NiceBarX or similar) might be interfering. Try disabling other status bar tweaks temporarily to isolate the issue.
- Respring: A simple respring often fixes visual glitches.
“My VPN disconnects/reconnects erratically when switching apps.”
- Review Your App Blacklist: This is the expected behavior if you have apps on your App Blacklist. When you open a blacklisted app, the VPN disconnects. When you switch away, it reconnects. If this is happening with apps you didn’t blacklist, check the list again to ensure no unintended apps are on it.
- Check Your VPN App’s Settings: Some VPN apps have their own “kill switch” or “auto-connect” features that might conflict with AutoVPN. Try disabling those native features and letting AutoVPN have full control.
“AutoVPN causes battery drain.”
- AutoVPN itself is extremely lightweight and should not cause noticeable battery drain. However, if your VPN is constantly connecting and disconnecting (e.g., due to very frequent app switching), that process can use some battery. Review your automation rules to ensure they aren’t too “twitchy.” The Wi-Fi blacklist is generally more battery-friendly than per-app rules, as network changes happen less often than app launches.
“I can’t find AutoVPN on Havoc after adding the source.”
- Ensure you typed the repository URL correctly:
https://havoc.app/ - Try refreshing your sources in your package manager. In Sileo, pull down on the Sources tab to refresh. In Zebra, tap “Refresh” in the Sources tab.
- If you still can’t find it, use the search function in your package manager and try searching for “Snail” (the developer) to see all their tweaks.
Is AutoVPN Worth It in 2026?
With iOS having evolved significantly since iOS 16, and with users on newer versions like iOS 26 relying on semi-jailbreak tools like Nugget, you might wonder if a dedicated VPN automation tweak for older iOS versions is still relevant.
The answer is a definitive yes for its target audience. Millions of users remain on jailbroken iOS 15 and 16 devices, either because they prefer the stability of a full jailbreak or because their devices don’t support newer iOS versions. For these users, AutoVPN provides a level of VPN integration and intelligence that Apple still hasn’t built into iOS. The ability to tie VPN state to specific Wi-Fi networks and apps is a powerful productivity and privacy tool that transcends iOS versions.
Furthermore, at just $1.99, it’s a one-time purchase for a utility that can save you from countless manual VPN toggles over the lifetime of your device. It’s a perfect example of why many users jailbreak in the first place: to take core system features and make them work exactly the way they want.
Conclusion: Take Control of Your VPN
AutoVPN by Snail is more than just a tweak; it’s a quality-of-life upgrade for anyone who uses a VPN regularly on a jailbroken iPhone. By automating the mundane task of connecting and disconnecting, it ensures you’re always protected when you need to be, and never inconvenienced when you don’t. Its clean preferences pane, combined with a subtle but customizable status bar indicator, makes it a polished addition to any jailbroken setup on iOS 15 and 16.
If you’re tired of babysitting your VPN connection, head over to the Havoc repository, grab AutoVPN, and let your iPhone handle the smart work for you.
You might also like
Scarlet iOS – Install IPA applications directly on your iPhone via sideloading in 2026
Mar 14, 2026
iLoader – User-Friendly open-source desktop application that simplifies iOS app sideloading
Mar 14, 2026